Views: 0 Author: Site Editor Publish Time: 2026-06-13 Origin: Site


Home studio creators frequently purchase microphones based on professional studio recommendations, only to find their recordings ruined. They invest heavily in premium gear but quickly face harsh untreated room acoustics, intrusive background noise, or inappropriate gain staging. You might buy an expensive model, but the audio still sounds thin, distant, or muddy.
We must move past the generic "dynamic for live, condenser for studio" advice. Instead, you need a realistic, evidence-based framework for evaluating microphone architecture. This framework must match your physical recording space, technical workflow, and end-product goals. You cannot force a highly sensitive microphone to perform perfectly in a noisy apartment without severe compromises.
This guide will give you a clear shortlisting strategy. You will understand exactly which microphone fits your room geometry and budget. We will help you prevent wasted money on mismatched gear and complex signal chains, ensuring you capture clean, professional audio from day one.
Your physical recording environment (acoustic treatment, background noise) is the primary filter for choosing between microphone types.
Dynamic microphones excel at rejecting off-axis noise but require significant clean gain from preamps.
Condenser microphones offer superior transient response and high-frequency detail but are highly unforgiving of poor room acoustics.
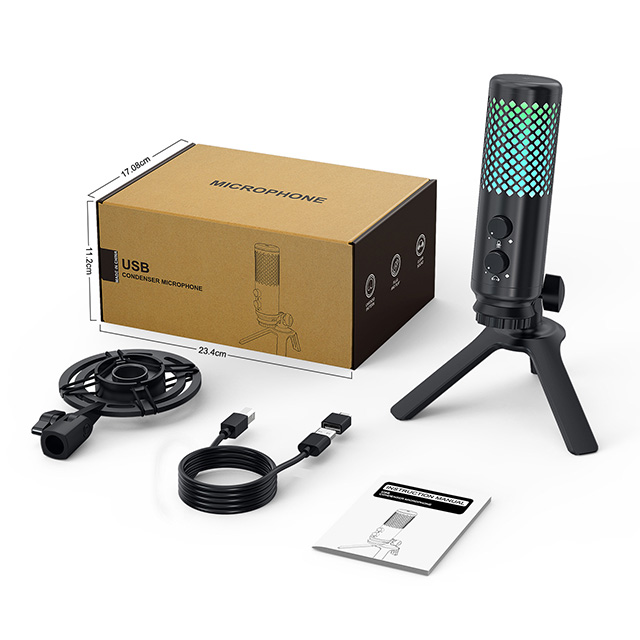
A high-quality USB condenser microphone often provides the most cost-effective and scalable entry point for solo creators by eliminating the need for expensive external audio interfaces.
Before you look at frequency response charts or polar patterns, you must evaluate the room where you will actually record. Most beginners ignore this step. They assume expensive gear automatically fixes bad sound. This assumption leads to immense frustration during the mixing phase.
Professional vocal booths feature floating floors, non-parallel walls, and dense fiberglass absorption panels. These rooms physically trap sound waves. Typical bedroom studios feature parallel drywall, hard floors, and glass windows. Sound bounces aggressively between these hard surfaces. This bouncing creates standing waves and phase cancellation. The "best" microphone in the world sounds terrible in a bad room because it accurately captures the bad room. If you record in a square bedroom, the microphone capsule will record your voice alongside dozens of harsh micro-echoes bouncing off your walls.
Your "noise floor" represents the constant background sound present in your recording space. In a home studio, this floor is usually much louder than you realize. Human brains naturally filter out ambient sound. Microphones do not. You must identify your common home studio liabilities:
HVAC systems: Air conditioning units create low-frequency rumble.
Computer fans: High-performance laptops spin up loudly during recording sessions.
Street traffic: Sirens, engine rumble, and tire noise easily penetrate standard glass windows.
Peripheral noise: Mechanical keyboard clicks and mouse movements bleed into gaming or streaming setups.
Highly sensitive microphones grab all these sounds. You must match your microphone's sensitivity to your room's actual noise floor.
Fixing the wrong microphone choice in post-production carries hidden costs. You might try aggressive noise gating to silence background hums. Heavy noise gating often clips the beginnings and ends of your words, sounding unnatural. You might attempt massive equalization (EQ) cuts to remove boxy room reflections. Over-processing degrades the original vocal tone, making it sound robotic or hollow. Choosing the right physical microphone capsule prevents these destructive digital compromises.
Dynamic microphones dominate broadcasting desks and live stages. Their rugged internal design makes them highly reliable, but their unique acoustic properties make them secret weapons for untreated home studios.
Dynamic microphones use moving-coil technology. Inside the capsule, a diaphragm attaches to a small wire coil suspended in a magnetic field. Sound waves hit the diaphragm, moving the coil and generating an electrical signal. This physical process handles exceptionally high Sound Pressure Levels (SPL). You can shout directly into a dynamic mic without distorting the capsule. Furthermore, this heavy physical mechanism means lower overall sensitivity. Lower sensitivity is actually a massive feature for untreated rooms. It naturally rejects distant sounds like room echo or computer fans, focusing only on the audio source placed inches away.
All directional microphones exhibit the proximity effect, but dynamic models utilize it best. When you bring your mouth very close to the capsule (within two inches), the microphone heavily boosts low-frequency responses. Broadcasters leverage this low-end boost to create deep, authoritative vocal tones. You get that "radio voice" instantly. Because you speak so closely to the capsule, your voice becomes exponentially louder than the background room noise, effectively masking poor acoustics.
We must transparently address the hidden costs of dynamic setups. Because dynamic capsules have low sensitivity, they generate a very weak electrical signal. You must boost this signal heavily using a preamp. Most entry-level audio interfaces lack sufficient clean gain. Pushing a cheap preamp to its maximum introduces a noticeable, irritating white noise called "preamp hiss."
To avoid this hiss, many creators must purchase inline preamps, such as a Cloudlifter or a FetHead. These devices use phantom power to provide +25dB of clean gain before the signal hits the main interface. This requirement drastically increases your overall setup cost and adds cable clutter.
Podcasters recording long-form conversations.
Aggressive vocal styles, including hip-hop, heavy metal, and rock.
Live streamers sitting in noisy environments with mechanical keyboards.
Creators recording in untreated concrete or drywall rooms.
Professional recording studios rely almost exclusively on condenser microphones to capture pristine vocal takes and acoustic instruments. They offer unmatched clarity, but they demand respect regarding placement and room treatment.
Instead of a moving coil, condenser microphones use capacitive technology. They feature a highly conductive diaphragm placed parallel to a solid metal backplate. This setup requires external power, universally known as 48V phantom power, to charge the plates. Sound waves change the distance between the diaphragm and the backplate, altering the capacitance and creating an electrical signal.
Because the diaphragm is incredibly thin and light, it reacts instantly to sound waves. This enables highly sensitive transient responses. It captures the initial pluck of a guitar string or the subtle breath of a vocalist with stunning accuracy. Condensers also boast much wider frequency ranges than dynamic models, capturing airy highs and deep, natural lows.
For home studios, this incredible detail often becomes the primary drawback. A condenser microphone does not discriminate. It captures the beautiful nuances of your voice, but it also captures slapback echo bouncing off your monitor screen. It will record your neighbor's dog barking down the street. If you place a condenser in a highly reverberant room, your recording will sound incredibly distant and washed out, regardless of the microphone's price tag.
You can mitigate these risks with careful strategy. You must use acoustic isolation shields directly behind the microphone to block forward reflections. Proper mic placement is crucial. Keep the microphone away from corners where bass frequencies build up. Strict gain staging helps immensely. Set your input gain just high enough to capture your voice, ensuring you do not needlessly amplify ambient room noise. Hanging thick acoustic blankets around your recording area can also drastically reduce high-frequency reflections.
Nuanced acoustic instruments like classical guitars and violins.
Delicate, breathy vocal performances.
Professional voiceover work and audiobook narration.
Moderately to fully acoustically treated spaces.
Specification | Dynamic Microphones | Condenser Microphones |
|---|---|---|
Internal Technology | Moving-coil electromagnetism | Electrically charged capacitive plates |
Power Requirement | Passive (no phantom power needed) | Active (requires 48V phantom power) |
Sensitivity | Low (great for rejecting room noise) | High (captures immense detail and echo) |
Durability | Extremely rugged; handles high SPL | Fragile; sensitive to moisture and drops |
Frequency Response | Tailored, often focused on mid-range | Wide, flat, extended high frequencies |
Historically, audio engineers dismissed USB microphones as cheap toys. Modern engineering has completely flipped this narrative. Today, integrating the entire audio chain into one device solves massive headaches for solo creators.
Traditional XLR setups require multiple failure points. You need the microphone, a balanced XLR cable, a dedicated audio interface, and a USB cable connecting the interface to the computer. Modern USB microphones integrate the capsule, the preamp, and the analog-to-digital (A/D) converter into a single chassis. This design reduces points of failure. It eliminates heavy cable clutter on your desk. You plug one cable directly into your computer, bypassing complicated driver routing and bulky desktop hardware.
Evaluating your initial return on investment is crucial. A dedicated $150 USB Condenser Microphone often outperforms a $100 XLR mic paired with a cheap $50 interface. Why? Component matching. Engineers design the internal preamp and internal DSP (Digital Signal Processing) specifically for that exact capsule. In a cheap outboard interface, the preamps are generic, built to handle hundreds of different microphones poorly rather than one microphone perfectly. By optimizing the internal components, manufacturers deliver exceptionally clean audio at a much lower price point.
Solo creators must prioritize content velocity. If you spend 30 minutes troubleshooting audio interface routing before every recording session, you lose creative momentum. Podcasters, YouTube creators, and remote session musicians benefit massively from plug-and-play simplicity. You can toss the microphone in a backpack, plug it into a laptop in a hotel room, and achieve the exact same sound profile instantly. This consistency ensures your audience hears a uniform audio signature across all your videos.
We must provide an honest assessment of upgrade paths. The primary limitation of an all-in-one device is modularity. If you outgrow the preamp inside your USB microphone, you cannot simply buy a better preamp. You must replace the entire unit. You cannot swap individual components in the signal chain like you can with a modular XLR setup. However, for 90% of home studio creators, the sheer convenience vastly outweighs this modularity limitation.
You now understand the technology and the environment. Use this practical, three-step framework to finalize your microphone selection objectively.
Do not just look at the price tag of the microphone. Map out the full chain. If you buy a dynamic XLR mic ($100), you must also buy an interface ($150), an XLR cable ($20), and a boom arm ($50). Your total setup cost is suddenly $320. If you purchase a high-quality USB Condenser Microphone ($100) and a boom arm ($50), your total setup cost is only $150. Always evaluate the full hardware chain required to get sound into your computer before making a decision.
This is a highly practical evaluation criterion you can perform right now. Stand in the center of your recording room. Clap your hands loudly once. Listen carefully to the decay of the sound.
If you hear a sharp, metallic ringing bouncing around the room (a distinct flutter echo), your room acoustics are poor. Bias your purchase heavily toward dynamic microphones or heavily directional condensers.
If the clap sounds dead, tight, and disappears immediately, your room has decent absorption. You can safely explore sensitive studio condensers.
Match your daily tasks to the gear profile.
Choose a Dynamic XLR if: You track high-volume vocals (screaming, aggressive rapping), record in a shared or noisy apartment, and have the budget for a strong, clean external preamp.
Choose an XLR Condenser if: You have a heavily treated room, frequently track acoustic instruments like guitars, and plan to upgrade your audio interfaces and preamps incrementally over time.
Choose a USB Condenser if: You need immediate, broadcast-quality audio without a steep learning curve. It works best when you require portability, value clean desk space, and want to bypass the complexity and extra cost of external interfaces entirely.
Microphone selection is an exercise in matching gear to environmental limitations. You cannot just read spec sheets and buy the most expensive model. A microphone is merely a tool, and the "best" tool depends entirely on your specific workspace.
Take action before adding anything to your cart. First, conduct a quick acoustic audit of your room using the clap test. Identify your primary noise sources. Second, define your strict budget ceiling for the entire audio chain, not just the microphone itself. Finally, choose the architecture that works with your room, rather than fighting against it. By matching the right capsule to your environment, you will capture crisp, professional audio that requires minimal fixing in post-production.
A: Yes, but you must aggressively manage the environment. Use heavy blankets behind you, deploy an acoustic reflection shield behind the microphone, and utilize close-miking techniques. Bring the mic within three inches of your mouth and lower the input gain. This maximizes your voice volume relative to the room echo, though it will not completely eliminate bad room acoustics.
A: No. USB microphones have built-in analog-to-digital (A/D) converters and preamps inside their chassis. You plug them directly into your computer’s USB port. The microphone itself acts as your audio interface, handling all signal processing internally. This saves desk space and money.
A: Dynamic microphones use passive, moving-coil designs that require massive physical sound pressure to generate electrical signals. They inherently output a much lower signal level than externally powered condensers. You must turn up the gain on your audio interface significantly higher to reach standard recording volumes.
A: Absolutely. Modern USB microphones feature excellent 24-bit/96kHz A/D converters and DSP routing. They deliver pristine audio suitable for professional podcasts, voiceovers, and YouTube content. You only need to graduate to an XLR setup if you want to swap out specific outboard analog preamps for vintage coloration.


